Drafting my own underwire bra pattern

Due to my size/shape fluctuations, I’ve been without a properly fitting bra for many months. Ready-to-wear bras never fit me, and fitting bra sewing patterns to my body takes a lot of time and energy. So while I have successfully fitted commercial bra patterns in the past, I was dreading having to do it all again — especially because I don’t know how long my current measurements will be this way.
The plan
My recent successes with wardrobe gap filling (gloves, shorts, and pants) gave me the motivation to make a new bra. And seeing as I’d need to spend time on fitting in any case, I decided to draft my own underwire bra pattern to my personal measurements. That way when my body changes in the future, I can just draft a new pattern!
Back in 2021 when I first learned to sew bras, I bought the Porcelynne Bare Essentials Bras book (I wanted a written reference for bra construction and pattern manipulation, and this was more affordable than Beverly Johnson’s books). But until now I hadn’t actually used it to draft a bra for my measurements (I did an early practice draft, but for a random wire that I knew wouldn’t fit).
The drafting instructions are detailed but broken down into steps, and there is an online calculator to help with all the derived measurements. There is also a private Facebook group that is very helpful too (although at time of writing, the search functionality is broken). Some of the measurements provided by the calculator are different to what’s shown in the book.
My measurements:
- Wire: size 100 French (245mm long, 14cm diameter) from Idonim. Pretty close match to size 42 short vertical Porcelynne wire.
- Over bust: 84cm
- Full bust: 88cm
- Under bust: 72cm
- Chest height: 14cm
- Breast spacing: 1cm
(Not used for the draft, but kept here for reference: Bottom cup depth 7cm, Horizontal hemisphere 21cm)
Result
The band draft was straightforward, but the cups took a bit more work — which makes sense, given the 3D nature of them. After 3 cup drafting attempts I had something ready to sew and fit! (3 drafting attempts doesn’t seem like that many to me)
I made a fitting band using my new pattern, then sewed one cup for each fitting iteration, basting it to the band. I pinned out tiny bits of excess fabric, transferred the changes to the paper pattern, then cut and sewed the new version of the cup.
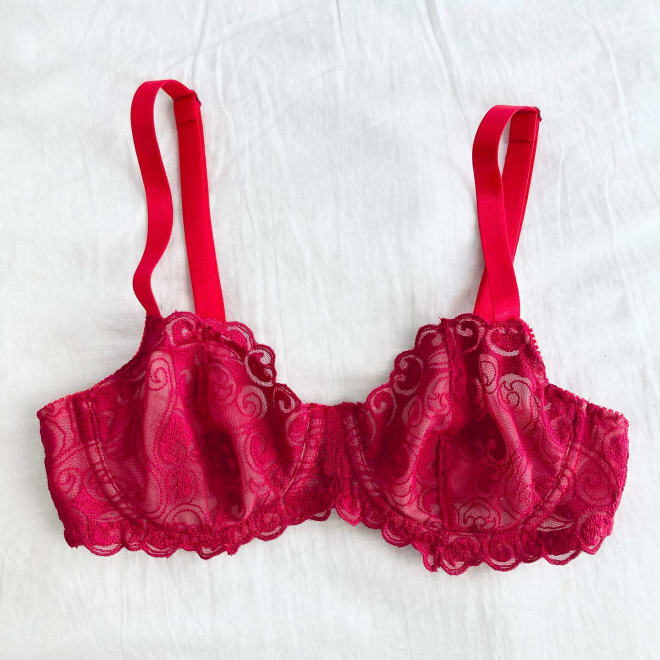
I had to stop the fitting cup iterations at some point because I ran out of test fabric (good enough is good enough already). I made a real version using my usual red materials — and it fits really really well for a first version!
Success!
Details
-
Pattern: Self-drafted using the Porcelynne Bare Essentials Bras book
-
Size: Me today ❤️
-
Modifications: Straight neckline (folded)
-
Fabric: Power net for the band; sheer cup lining for the bridge, frame, and cups
Project notes
11.02.26 — Draft 1
1. Drafting the pattern
The drafting process is based on your wire size + your own measurements, so we need to know the exact wire size before doing anything else. I had a few different sized wires from the last time I made a bra (from a commercial pattern), and luckily one of those fits me perfectly. It’s not a Porcelynne wire, but that doesn’t actually matter because we can just adapt the instructions a bit.
There are a lot of derivative measurements to keep track of, and naming throughout the book is not always consistent. Be careful and double check stuff (I didn’t and that made things more confusing)! The online calculator is very helpful.
Quite a lot of paper chopping/pasting is involved in the hand drafting method, so my normal printer paper wasn’t the best choice – it got pretty thick in some places. I did look at the digital drafting pages, but the steps were quite different so I just continued with my paper.
Result: Onced I’d finished all the steps, it did look like an actual bra pattern. I traced and cut out a paper model of the cup – and surprise surprise, it’s the right size! It will probably need adjustments on curves during fitting.

2. Fitting the band
I’ve never actually made a fitting band before, so I made my first one using my new pattern with some adjustments:
- 10mm seam allowances (easier to sew than the standard 6mm)
- 5cm extra added to bridge (for bridge fitting)
I used real materials for the fitting band: power net, sheer cup lining, 10mm and 12mm picot elastic, wire casing, strap elastic, metal rings and sliders. I constructed the left and right halves separately, and pinned them at the center front to check the fit of the bridge.
I sewed the wire casing directly outside of the wireline seam allowance, so that cups can be attached/removed easily.
Result: The bridge is fine, the wire is perfect, but the back band is too long — I had to use the tightest hooks, that’s probably a drafting error on my side. The band and frame pieces didn’t line up properly: I’ll need to be more careful tracing, cutting, and sewing.
3. Fitting the cup
I made a fitting cup from a single layer of sheer cup lining, with 10mm seam allowances (easier than standard 6mm). I also applied picot elastic to the neckline and underarm, which I stopped doing later on (just stay-stitched instead).
Result: The volume is globally OK (yay!), but the wireline is too long (doesn’t fit the band), and the horizontal seam didn’t match up – the top cup was too long for some reason. I think I introduced errors at page 177, so will redraft the cup (easier than debugging).
I also realized I need notches/guidelines for lining up the cup to the band accurately! Flimsy fabrics + every millimeter counting towards fit = need to be more precise.
13.02.26 — Draft 2
I redrafted the cup using calculations from the online calculator, with shallow lower cup bust depth and average top cup depth.
The cup wireline now fits properly: at page 177 I previously aligned the top and bottom pieces to the band curve (instead of the reference circle used for the wire), so essentially just made stuff up at that point lol.
BUT the horizontal seams don’t match — and mathematically they can’t. Did I miss a step? Step 15 looks like it wants us to fudge the lines after all the calculations, but at the same time it looks specific to the demi wire instructions…
14.02.26 — Draft 3
V1
After quite a bit of head scratching and geometry revision, I redrafted the cup using average cup bust depth for top and bottom. Even if the bust point doesn’t match my apex, the volume is good, so I’ll just test fit it from here. On page 170 the book mentions that smaller cup sizes might not need a 2-piece bottom cup, so I tried a single-piece bottom cup for simplicity.
I sewed another fitting cup, attached it to the fitting band, and made some quick adjustments:
- Pinned out 1cm vertically, tapering to nothing at wireline and neckline
- Pinned out 5mm horizontally, tapering to nothing at wireline and apex
V2
I transferred the fit adjustments above to my paper pattern, slicing and overlapping vertically by 1cm. Then I sewed another fitting cup: now there’s a flat spot at center of bottom cup…
V3
After a quick google search (“flat spot bottom cup bra fitting”), I realized I did actually need that 2-piece bottom cup. So I split the bottom cup and added 4mm curves to the vertical seam (2.5% vertical bust diameter).
Result: the new cup fits well, even if the bust point isn’t exactly aligned. I think we can move on to a real bra tomorrow.

15.02.26 – Final version
Today in the Facebook group, the author clarified what step 15 means: the book says “Adjust the seam lines of the cups to match the original horizontal and vertical amounts”. Jen explained “To correct the horizontal length, you need to extend the lines past the circle until you measure the horizontal length again”. That makes sense now, I’m not really sure why I didn’t understand it in the first place – maybe the wording, or maybe the illustration wasn’t clear.
Armed with this new knowledge, I decided to try aligning the bust point before making a real bra.
V4
I shifted the apex vertically by adding 2cm to the horizontal seam of the top cup, and removing 2cm from the horizontal seam of the bottom cup pieces. Then I sewed another fitting cup.
I think the fit should basically be the same, but it somehow looks more natural sitting at the true apex… But of course with the modifications I made, the horizontal seam is no longer horizontal (which seems obvious now). To straighten that, I’ll need to add/remove the 2cm along the whole seam – not just at the middle.
V5
To realign the horizontal seam, I lengthened the whole top cup 2cm, and shortened the bottom cup pieces 2cm. And then I was back to struggling to match the seams and wirelines of top and bottom pieces…
I didn’t even make a new fitting cup, and just put this version aside. I might come back to it later, but I’m running out of test fabric, and I really need an actual wearable bra now!
Back to V3
So I cut my losses and moved on to sewing a real bra. It had been quite a long time since I last sewed one, so my construction is a bit sloppy. My old bra construction blog article was very helpful though!
- 1cm seam allowances were definitely a good idea with such flimsy fabrics
- I need to be more careful with layer ordering for enclosed seams (I had to carefully unpick seams multiple times)
- The folded upper cup didn’t work well when sewn burrito-style (for enclosed seams) — I had to carefully unpick the seam twice…
- Be more careful with top stitching and applying elastics next time


16.02.26 — Fitting
I finished attaching the straps today and am super happy to finally have a new bra!
Result:
- The cups fit well, but appear smaller on the body once sewn in properly: I could make the neckline higher
- The band is a bit tight: I’ll add 1cm
- The bridge is good at the top (flat against chest!!) but gapes at bottom: I’ll try a single-piece bridge next time
- The neckline bulges slightly: I’ll add ½cm to neckline of top cup
- New bust size with bra on: 86cm (important for my future sewing projects!)

18.02.26 – Update
Actually after wearing the bra for a couple of days, the band is perfect! I guess I just wasn’t used to wearing a bra anymore lol.
The bra is awesome, I’m proud of my drafting achievement, I want to make more bras in different styles (like I did with the Maya bra), and I want to draft a bodice block for more me-drafted clothes!
Highly recommend this book.