Let’s make a bra: construction
For our tester/fitting bra we need to use real bra materials and proper techniques. This will be a simple lined bra without foam, for precise fit evaulation and pattern adjustments.
Warning: don’t use your prettiest supplies for a first bra – there are chances it might not even fit properly, so use something basic for this one and save that lace and polkadot tulle for your second attempt with fit modifications. In her online class Beverly Johnson even recommends against doing your best work on your first bra…
This is a long page, but I’ve broken it down into steps so let’s get into the nitty gritty:
- Prepare the pattern
- Cut the fabric
- Sew the cups
- Sew the band
- Attach cups and band
- Apply elastics and hardware
Note: ignore the choppy fabric edges in the photos below, my fabric shears got jammed so I cut everything out with my paper scissors… 😆
Step 1: Prepare the pattern
Closure
Check that the hook & eye closure fits between the sewing lines. If it doesn’t, draw a new line from the narrow band edge to the wider edge to make it fit.
Elastic
We need to make sure our elastic fits along the top and bottom edges (otherwise we’ll be making the bra shorter in height and our wires won’t fit). The pattern includes 8mm seam allowances all around, so:
- For 10mm top elastic, extend the seam allowance by 2mm along the top of the back band, cradle, and the angled edge of the upper cup piece.
- For 12mm bottom elastic, extend the seam allowance by 4mm along the bottom of the back band and cradle.
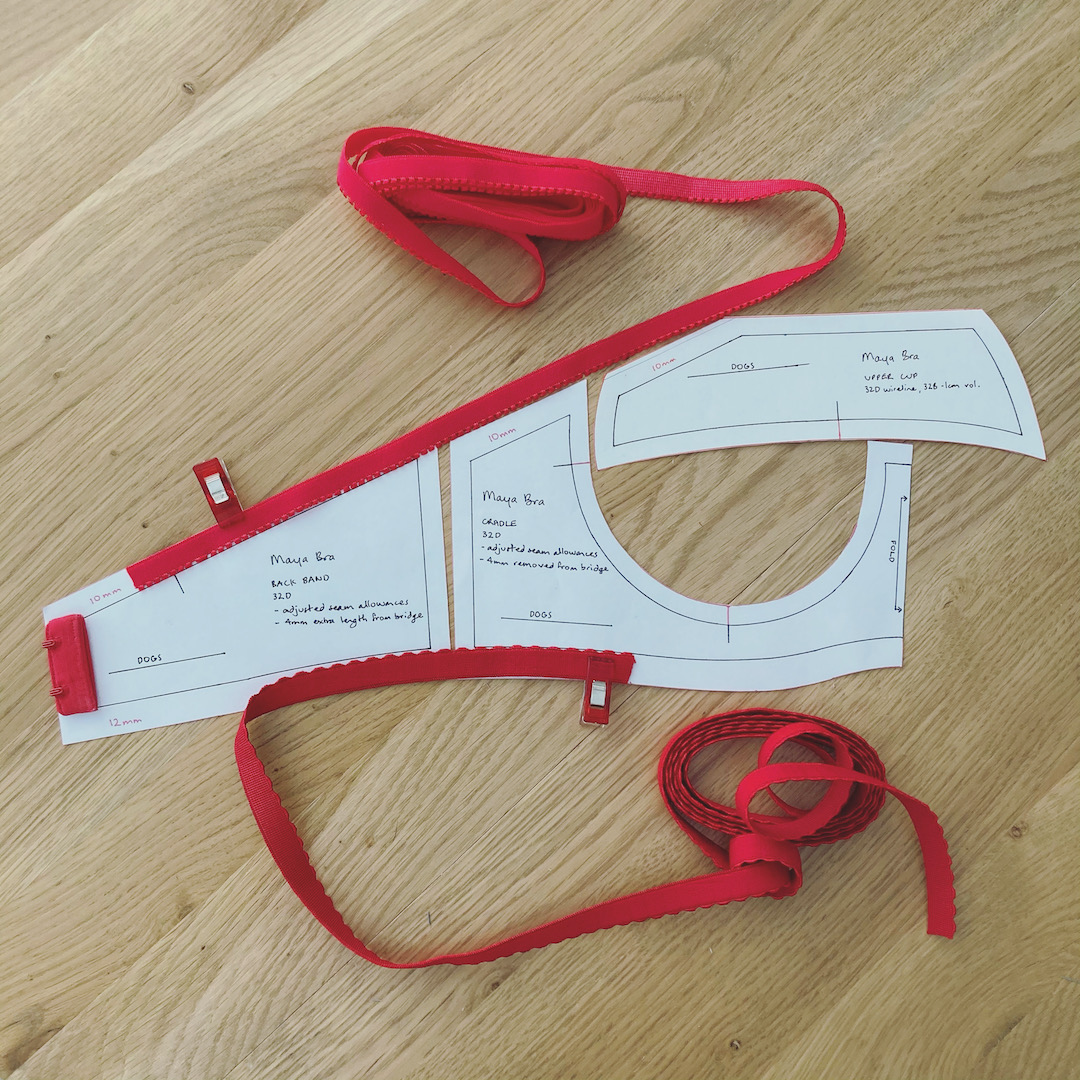 Closure laid on pattern to verify it fits. Seam allowances increased to match elastic sizes on back band, cradle, and upper cup angled edge.
Step 2: Cut the fabric
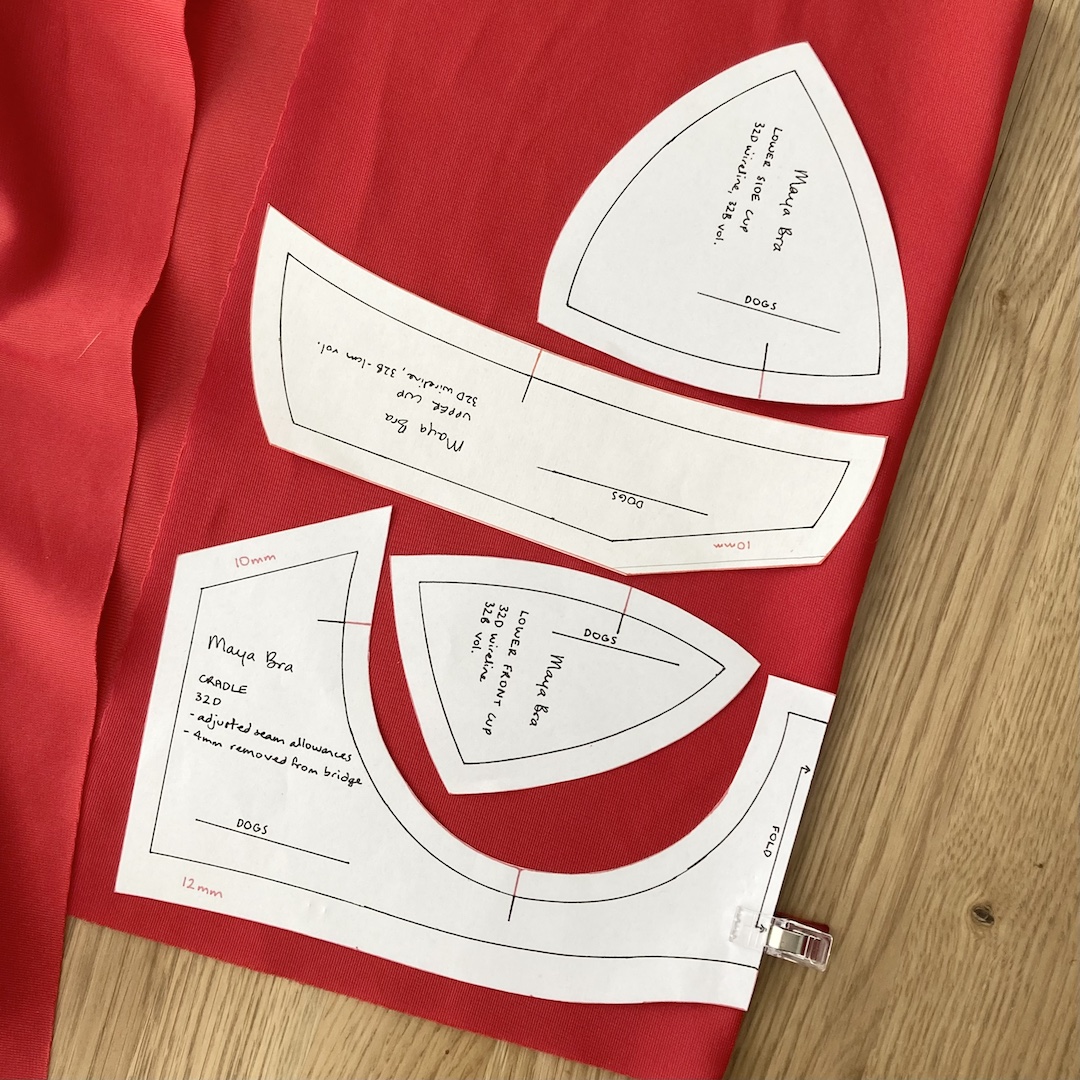
Fold the fabric, line up the DOGS arrows in the Direction of Greatest Stretch, and cut out the pattern pieces (both layers at the same time). We cut mirrored to get pieces for the left and right sides.
 We really don’t need that much fabric, and playing tetris with pattern pieces means less waste! Just keep the DOGS correct.
Main fabric
- 2 x upper cup pieces (mirrored)
- 2 x lower side cup pieces (mirrored)
- 2 x lower front cup pieces (mirrored)
- 1 x cradle pieces (with bridge edge along the fold)
Lining fabric
- 2 x upper cup pieces (mirrored)
- 2 x lower side cup pieces (mirrored)
- 2 x lower front cup pieces (mirrored)
- 1 x cradle piece (with bridge edge along the fold)
Band fabric
- 2 x back band pieces (mirrored)
Note: If your fabric isn’t wide enough to place the cradle on the fold with the DOGS going the right way, you can chop it in two and add a seam allowance:
 Before actually cutting these, I turned the cradle piece upside down and moved it up into that empty space, to make better use of fabric.
Transfer notches with a washable marker, and lay out the pieces so it’s easier to see what’s what.
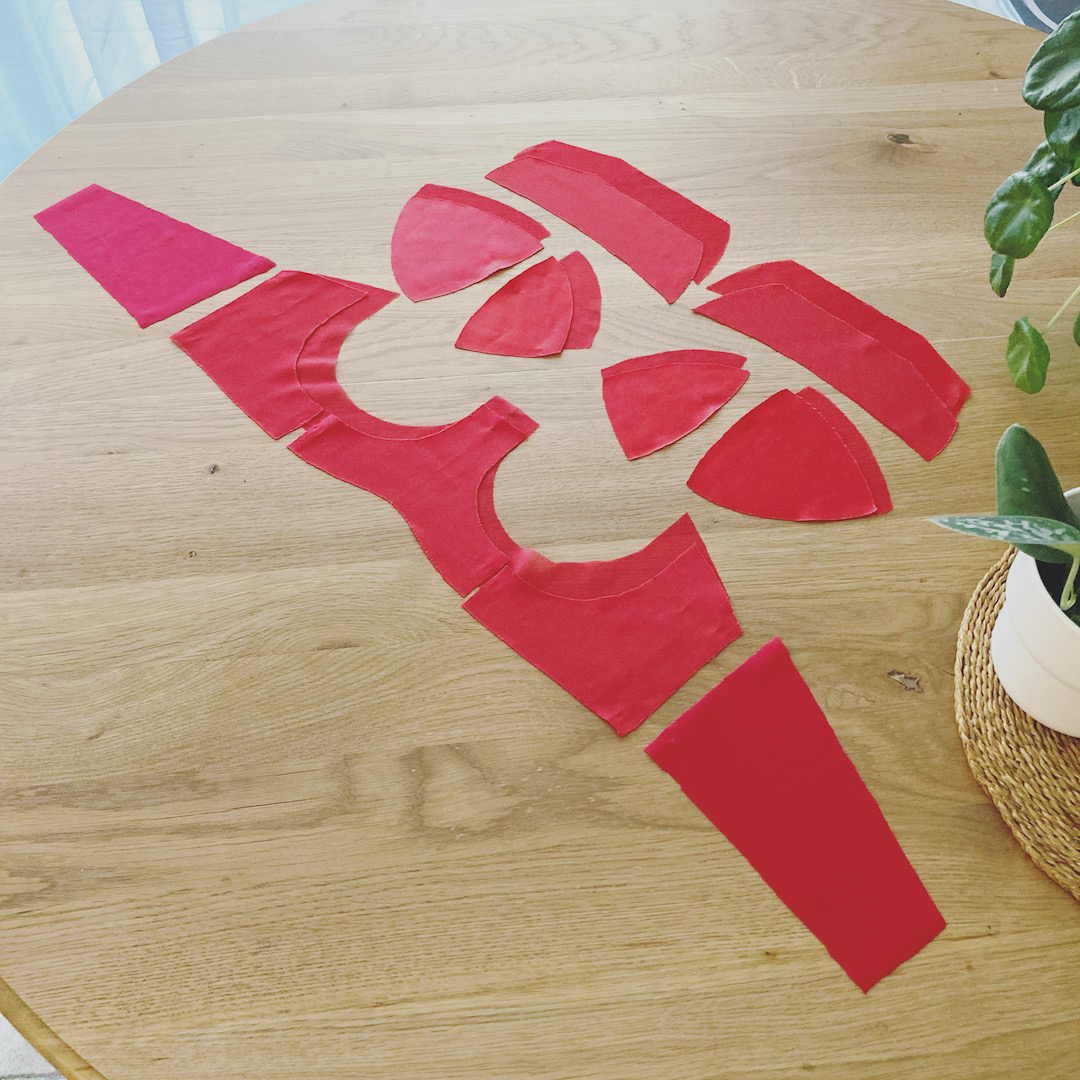 Main and lining fabric pieces laid out together. I have a separate bridge piece here, to make use of some leftover fabric.
Step 3: Sew the cups
We’ll enclose all the seams to make everything as pretty on the inside as it is on the outside.
Prepare the lower cup
- Lay all the cup pieces for one side together in this order: main lower side then front cups (right sides together), and then lining lower front then side cups (right sides together). You should have a sandwich of main/main/lining/lining, with the smaller pieces in the middle.
Pin at the apex notch. - With a straight stitch, sew the pieces together carefully, easing curves where necessary.
- Open the cup so that the main fabric is on the outside, and the lining on the inside. The seams should all be cleanly tucked away underneath.
- Press and top stitch. Repeat for the other cup.
Note: these fabrics are delicate, so we’ll need to keep our iron on very low heat! You may even want to use a thin protective layer when pressing.
 The sandwich order might seem pedantic, but it means no exposed seams on the inside or outside!
Attach the upper cup to the lower cup
Fully enclosed seams on a three-piece cup involves some trickery, so bear with me:
- Right sides together, pin the main upper cup piece to the top of the lower cup. Align the notch to the lower cup seam line, the wider end to the smaller front cup, and the narrower end to the larger side cup.
- Turn the pieces over, and pin the lining upper cup piece to the top of the other side of the lower cup. You should have a sandwich of main/main/lining/lining.
- With a straight stitch, sew the pieces together carefully, easing curves where necessary.

- OPTIONAL: larger cup sizes especially might want to stabilise the neckline edge with stay or twill tape, or even fabric selvage.
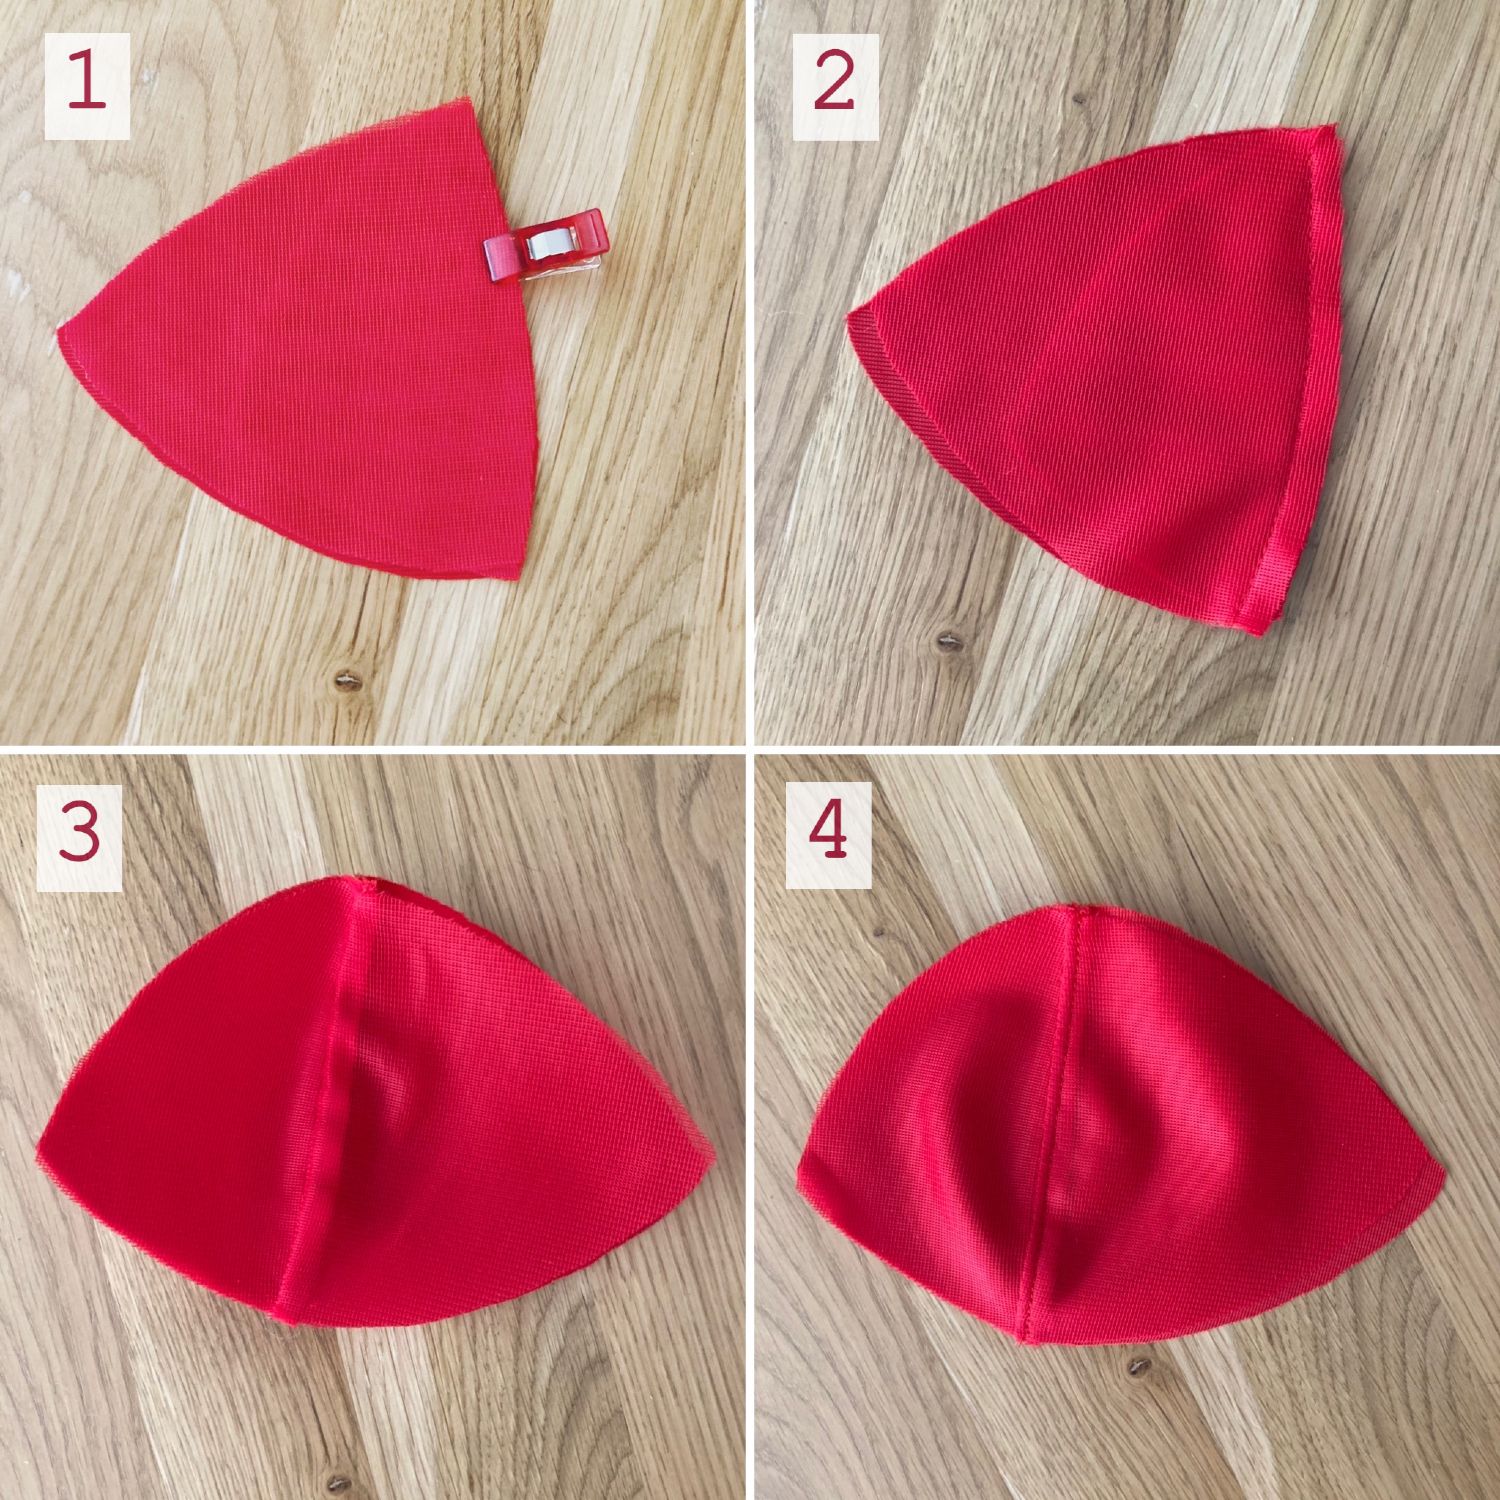
- Burrito time! This is where it gets weird:
- Roll the lower cup to get it out of the way, and open up the upper cup pieces (see fig. 1 below).
- Pin the upper cup main and lining edges right sides together, over the rolled-up lower cup (see fig. 2).
- Stitch the long straight edge of the two upper cup pieces, right sides together. You should end up with a strange sausage kind of thing (see fig. 3).
Note: don’t stitch along the short angled edge like I did, or you’ll need to unpick that to apply the underarm elastic later!
- Roll the lower cup to get it out of the way, and open up the upper cup pieces (see fig. 1 below).
- Pull the cup out through the open end, so all the right sides are facing out and the seams are tucked away inside.
- Press and top stitch. Repeat for the other cup.
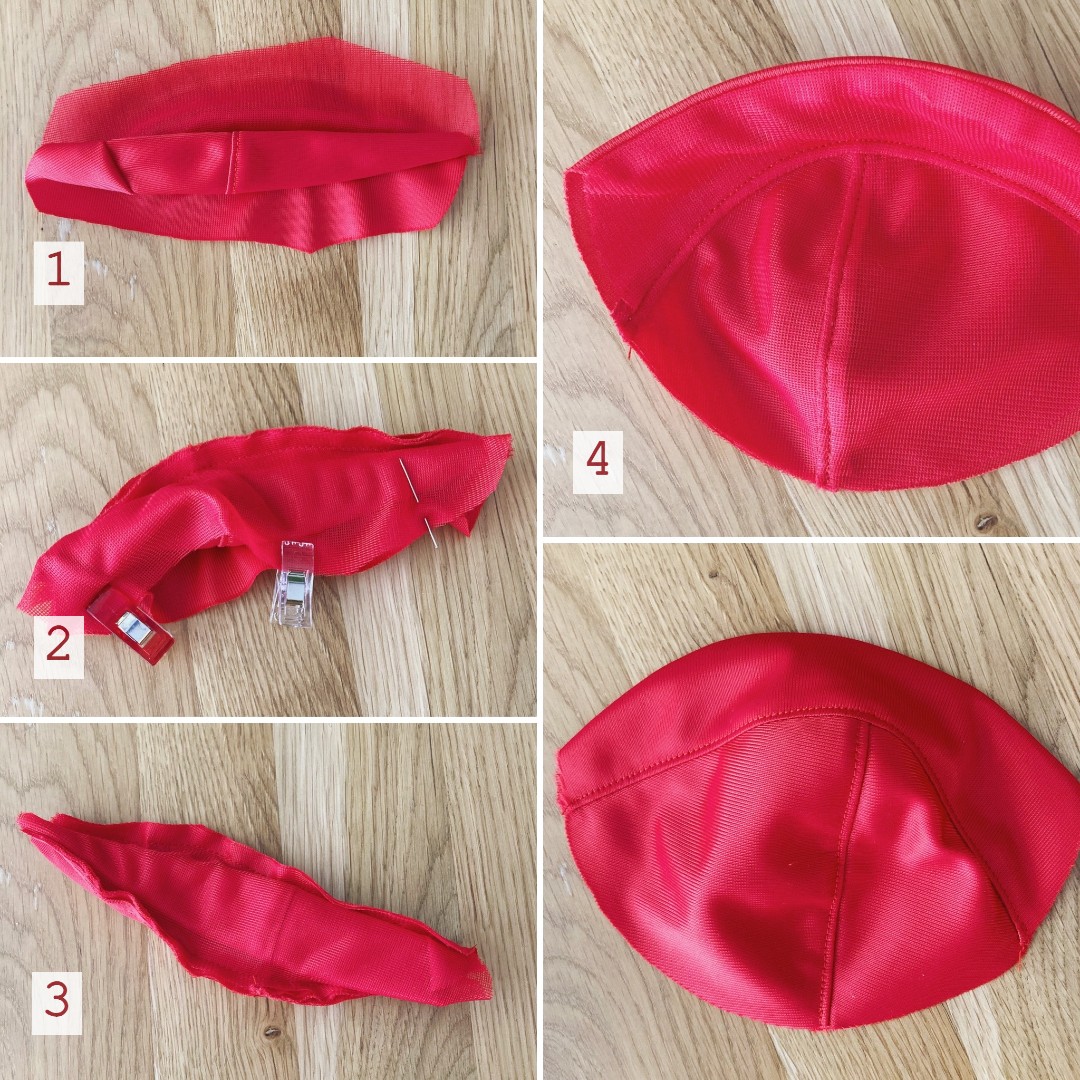 This is unintuitive, but when you turn the cup out, all the seams are magically enclosed on both sides!✨
Step 4: Sew the band
We’ll sew the band with enclosed seams too.
Attach the back band to the cradle
- Lay the cradle and band pieces for one side together in this order: main cradle (facing up), band (facing down and towards the center), lining (facing down). You should have a sandwich of main/band/lining.
Note: The little pointy end at the top is normal, it will line up with the cradle when opened up. - With a straight stitch, sew the pieces together carefully.
- Open the band so that the main fabric is on the outside, and the lining on the inside. The seams should all be cleanly tucked away inside.
- Press and top stitch. Repeat for the other side.
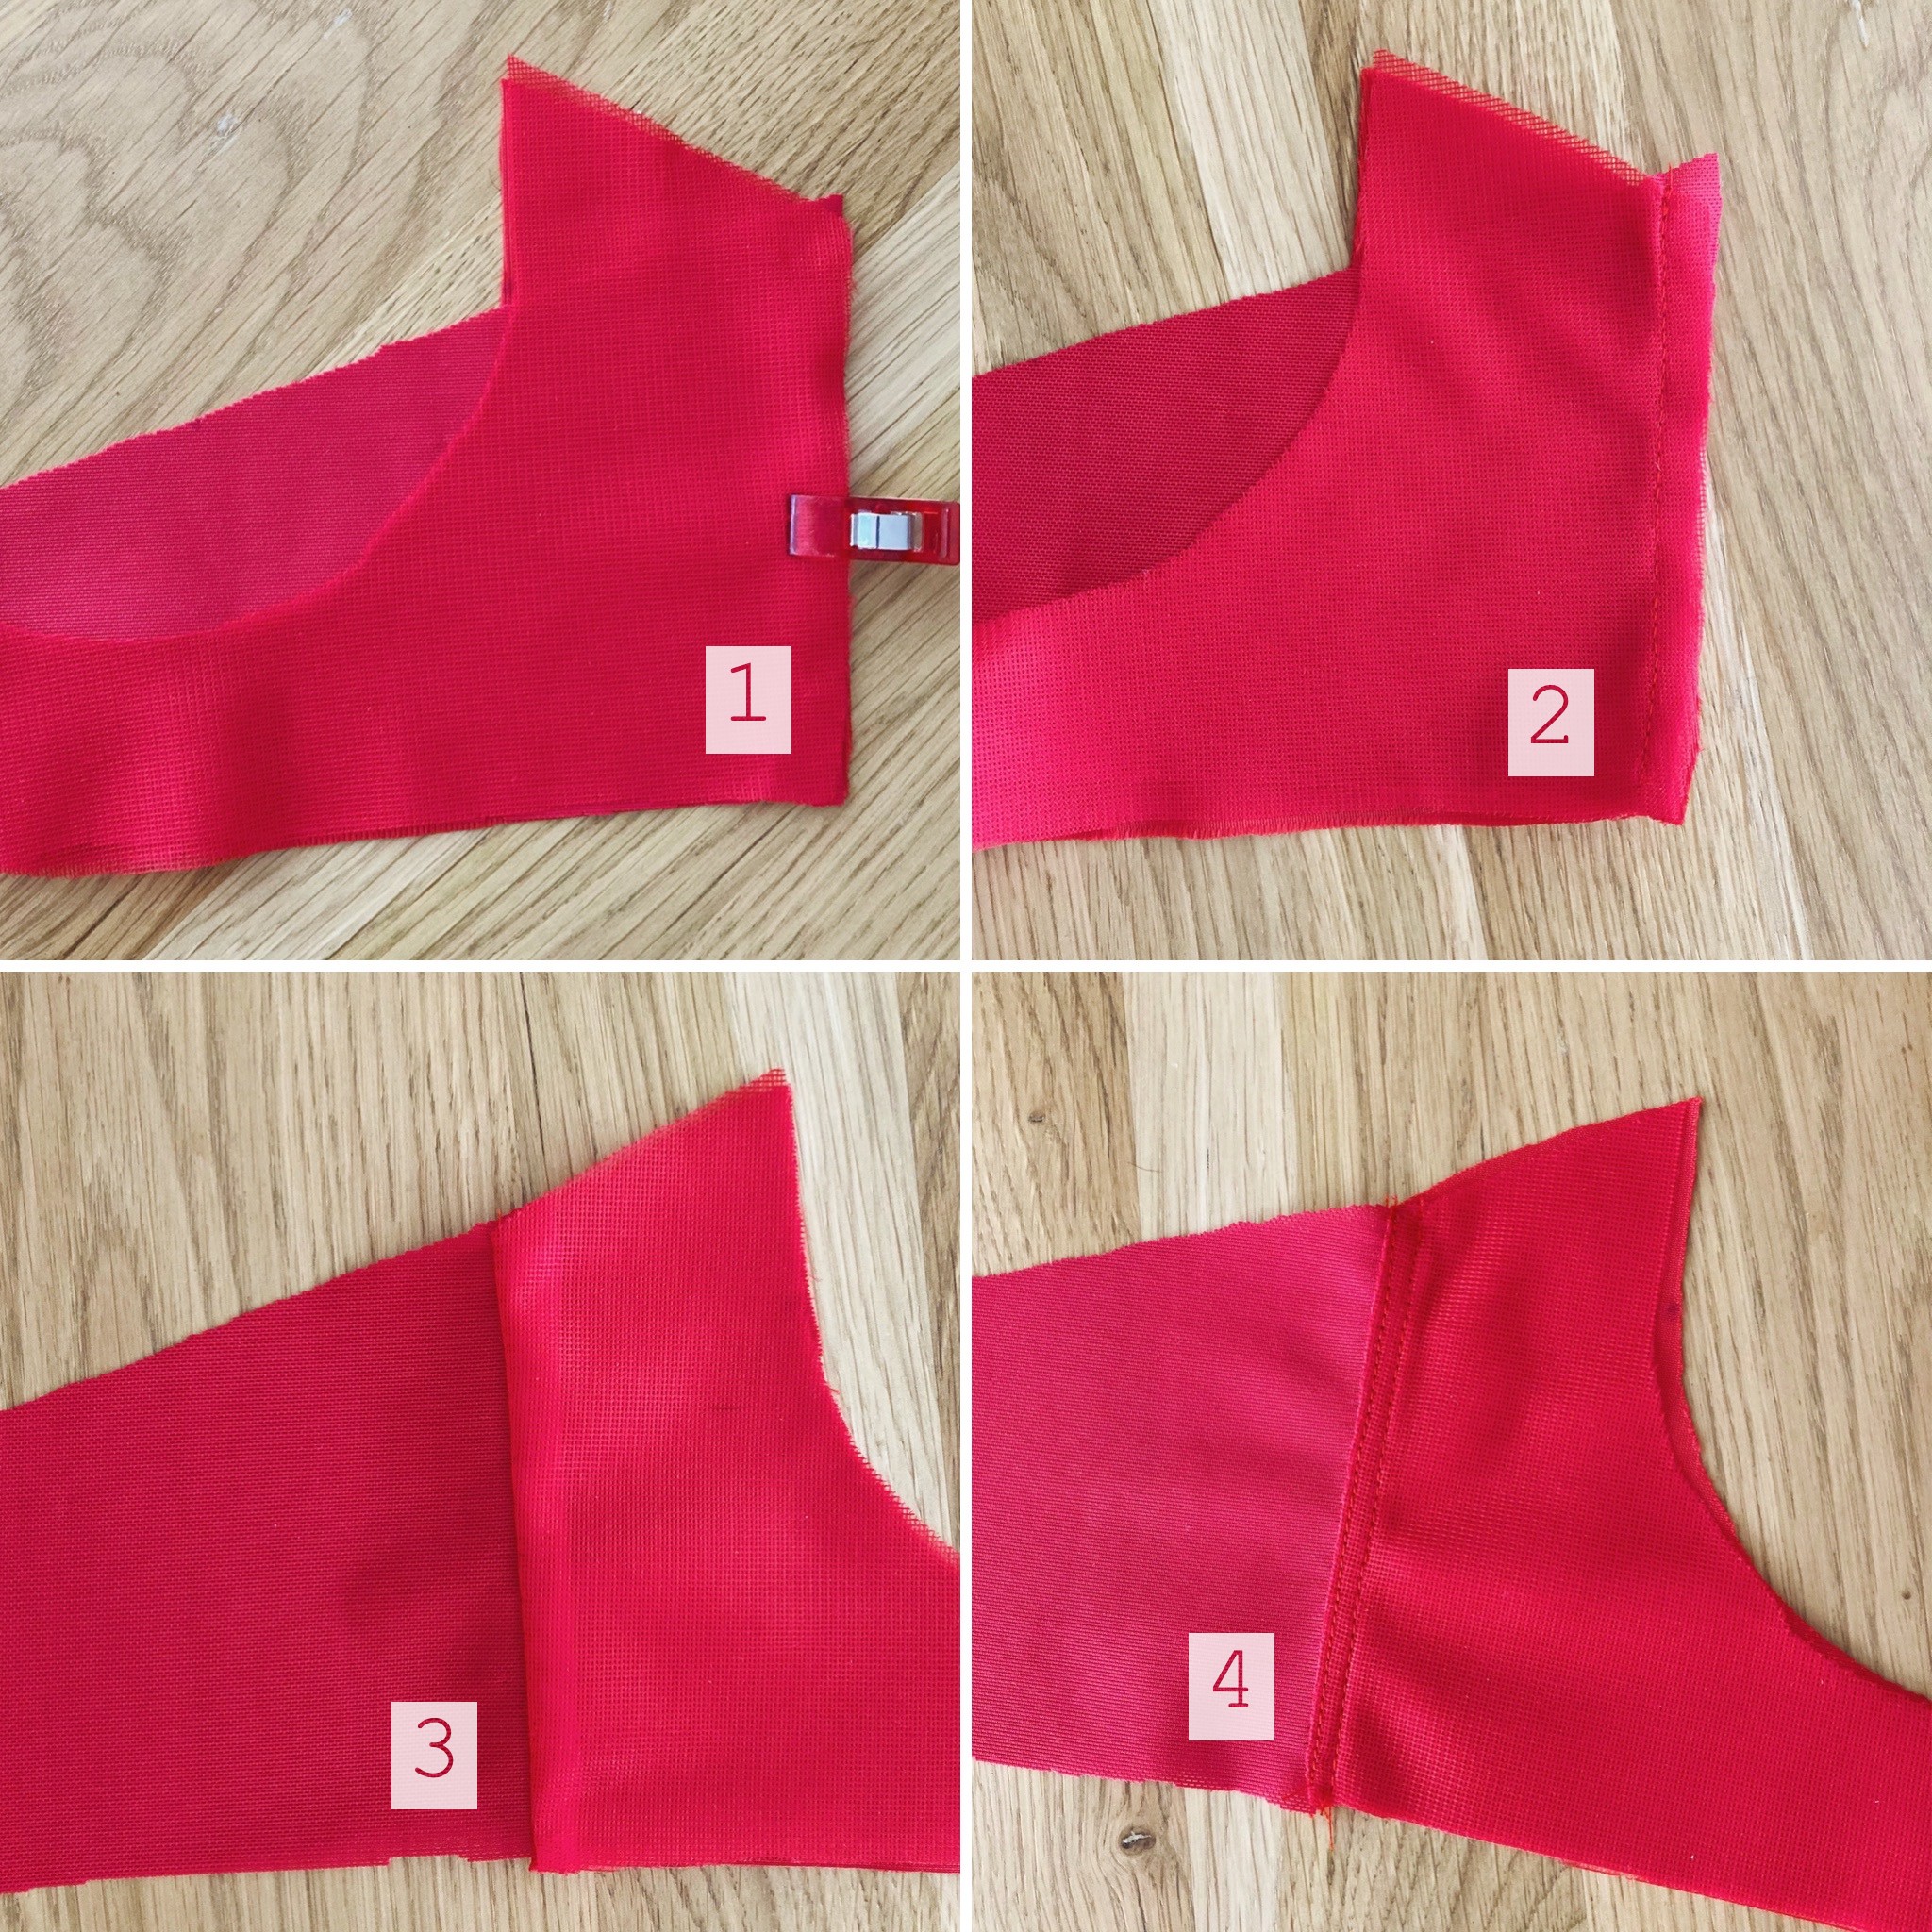 The band is attached to the cradle with completely enclosed seams.
Finish the bridge
- Pin the cradle pieces together at the bridge, right sides together.
- With a straight stitch: sew the bridge along the top.
- Press the bridge seam allowance towards the lining and under stitch it.
- Open the cradle so that the main fabric is on the outside, and press the bridge seam flat (the under stitching shouldn’t be visible from the outside). Baste the other open edges about 4mm from the fabric edges, to keep the two layers together.
 Basting the open edges is optional, but makes it easier to attach cups and elastics later.
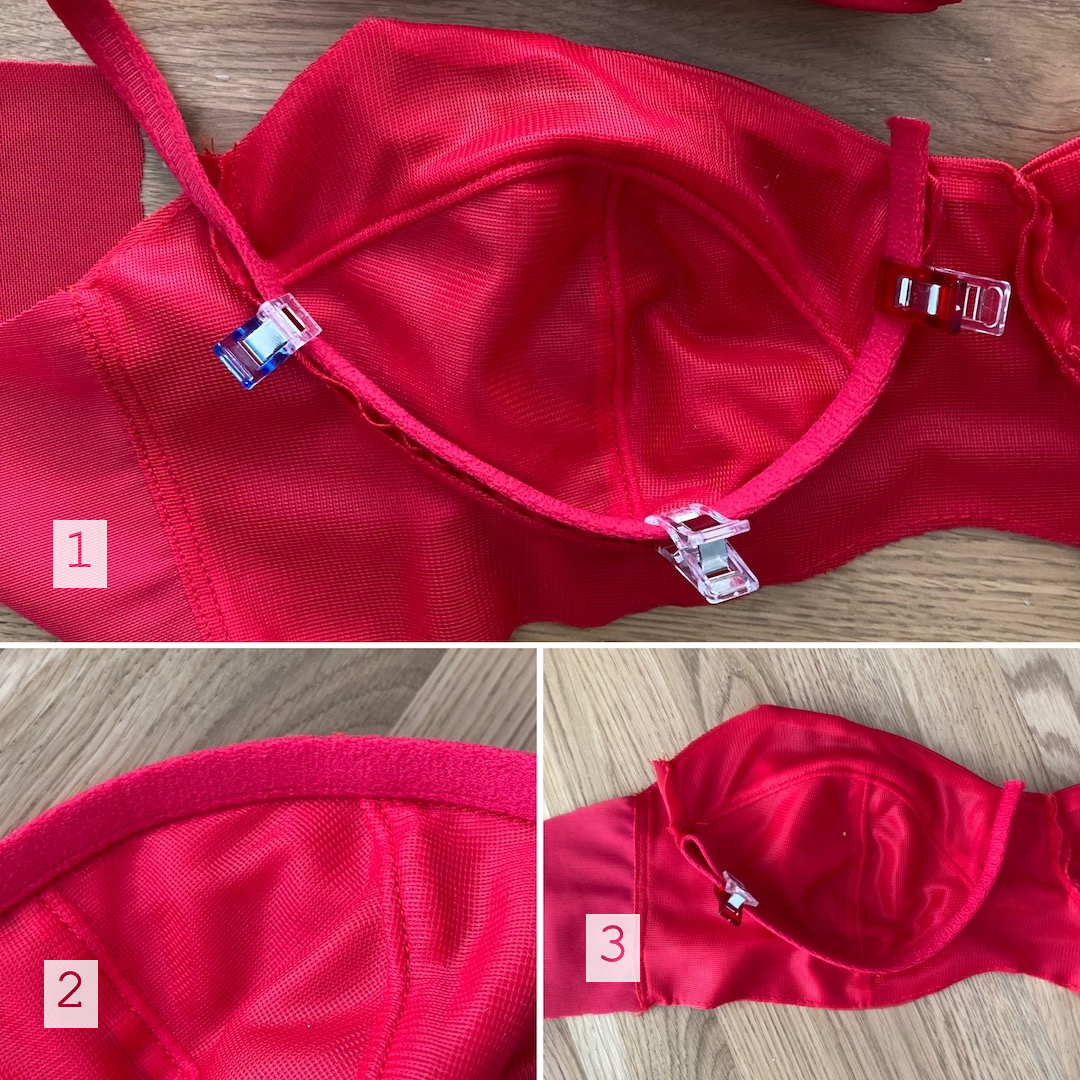
Step 5: Attach the cups to the band
- Pin the cradle notches to the cup seam lines, easing in the curves where necessary.
- With a straight stitch: sew the cups to the cradle, with band on top and cup underneath. Go slowly and adjust the fabric layers as needed to avoid puckers.
 With the cups attached to the band, it’s starting to look like a bra!
Step 6: Apply elastics and hardware
Attach the channeling
- Align the channeling to the stitch line on the inside of the cup seam allowance, with the plushy side of the channeling facing up.
- With a straight stitch: sew the channeling to the seam allowance, 2mm from the inner edge – stopping at the lower/upper cup seam line at the underarm ends to leave a loose end.
The stitching is only on the cup seam allowance and shouldn’t show from the outside. - Trim the channeling to the edges of the cup, and bar tack it at the bridge end to close. Pin the loose end out of the way.
Prepare the straps
- Cut a length of strap elastic, loop it through a slider, sew it closed.
- Loop the other end through a ring, then back through the slider.

Apply lower band elastic
- First pass: right side of bra facing up
- With the plushy side of the 12mm picot elastic facing up, line up the straight edge of the elastic to the edge of band fabric.
- With a zig-zag stitch, stitch as close as possible to the picots. This stitching will not be visible from the outside.
Hold the channeling out of the way – we don’t want that accidentally getting in our stitching!
Note: If you like a snug fit, stretch the elastic about ½” under the cup curves (between blue and red clips in the photo below). - When you get to the bridge curve, clip the fabric along the curve just enough to sew the elastic straight (between red clips in the photo below).

-
Second pass: wrong side of bra facing up
- Fold the elastic towards the inside of the bra. From the outside of the bra, you should see just the tiny picot edge peeking out from underneath.
- If you want to enclose the strap ends for a clean finish, place a strap end on each back band, inside the folded elastic, shiny side down/plushy side up.
- With a 3-step zig-zag, stitch along the straight edge of the elastic (opposite edge from the previous pass), then press. This stitching will show on the outside.

- Check that the hook & eye closure will fit
- The closure should fit over the picots of both elastic edges.
- Place the closure at the end along the bottom edge of the band, and the underarm elastic along the top edge of the band.
They should be perfectly aligned and there should be no extra space between the two.
- If there is a gap between them when they’re lined up, trim the top band edge now to ensure the closure will fit once we’ve sewn the underarm elastic.
Apply upper band / underarm elastic
- Allow 1” excess at the top to hold strap rings, and keep the cup seam allowance facing outwards towards to back band.
- Sew the top elastic in two passes like the bottom elastic, stretching a tiny bit along the cradle or upper cup to avoid gaping in that area.
Finish the channeling
- With the channeling facing away from the cups (towards the cradle), top stitch from the outside, stretching the cradle and cups apart to get close to the seam line. Make sure to align the loose underarm ends to the seam line!
- Do a second line of stitching from the inside of the bra, close to the edge of the channeling.
- Trim the channeling on the underarm side so it doesn’t show from the outside.
- Insert the underwires inside the channeling – make sure they go into the tube, not between the channeling and the fabric.

Finish the straps, attach the hook & eye closure
- Align the strap elastic and stitch to the top side of the band to secure.
- On the loop end of the strap, thread the excess underarm elastic through the strap ring, stitch to secure to the cup.
- Sew the closures. With the bra face down, positioned as if you were going to wear it:
- Sew the eyes facing out, on the left band.
- Sew the hooks facing in, on the right band.
- Make sure to sew with hooks/eyes facing up, so they don’t get stuck in feed dogs!
 Once everything is finished with enclosed seams, the ragged cutting edges caused by my paper scissors are nowhere to be seen… 😆
That concludes the construction phase, you now have a finished bra! 👏
 Eagle-eyed readers will notice this bra is ever so slightly different – it was my second attempt and the first well-fitting bra I ever owned!